
State of Repair is Motherboard's exploration of DIY culture, device repair, ownership, and the forces fighting to lock down access to the things you own.
Advertisement
For whatever reason, laptops are looking mighty attractive for Hackintoshing these days, despite the knotty qualms some people have with it. (For the unfamiliar, a Hackintosh is a generally Intel-based machine‚ not made by Apple, that runs MacOS. Often, they’re custom-built desktop machines, but laptops with the right specifications work as well.)That said, if you can get past those, you can put together a fairly stable machine that can handle much of what Apple’s own offerings can—without the incredibly high price to boot.I can speak from experience here because I did all the hard work myself already. As frustrated by the keyboard and the price as by the fact that nothing was upgradeable on the current generation of MacBook Pros, I went on this journey myself a year ago—and made it out on the other side much more knowledgeable about why MacOS is a great, quite flexible operating system, often (and unfortunately) placed in a not-so-perfect machine. I put in the time, offered the occasional helping hand on the forums, did a bit of research on the culture of Hackintosh, and gained a great appreciation for the process.I’ve been using a Hackintosh laptop as a daily driver for a year. Now, I’m sharing my insights here.A word of warning before we go any further: This is a project for the technically inclined. When I went through this process, I became close friends with my terminal. My machine crashed multiple times. And the fact is, as technical as I can get here, there are certain things that may not work. Also: This is a very technical process, and things can go wrong along the way. Think of this as a living document—it will be updated as needed, and if you spot any flaws or better ways of doing things, please reach out. We're happy to update.
Advertisement
But enough of the things that make MacOS worth installing work, and you can make a good weekend project out of this and get a good machine in the end—one with better specs and more upgradability than many of Apple’s own products.Nonetheless, it should be said: Read everything carefully, because missing even a small detail could keep you from a successful installation. There’s a lot here—so let’s get going!
The Parts You Need to Build a Hackintosh

The HP Spectre
For this build, we’ll be using an HP Spectre x360 from either late 2017 or early 2018—both of which use the same processor (an Intel i7–8550u) and graphics chips (an Intel HD 620, backed by an Nvidia GeForce MX150) but feature a different keyboard layout and charger type.While this isn’t the latest model, if you’re Hackintoshing a laptop, you probably want something that’s been on the market a little while, as that means the community has had time to test it.At $1,350, this machine is priced like a current-gen MacBook Air but is closer in specs to a MacBook Pro. It also has style—with its “dark ash” exteriors, brass trims, and understated HP logo, it stands out in a room full of Apple machines.Beyond its two USB-C ports (one supporting Thunderbolt 3), the machine also packs a few things the current MacBook Pro does not, including a USB-A port, a better-than-Retina 4K screen, an HDMI port, and a keyboard with actual travel. (The early 2018 model even has a number pad, if you roll that way.) The current MacBook Pro has a faster processor, but it’s also $1,000 more expensive. (Also, HP’s warranty program covers spills, something AppleCare famously does not cover.)
Advertisement
So why the 15-inch, rather than the 13-inch? Long story short: Upgradability. The 13-inch model has a lot of stuff soldered on, while the 15-inch variant allows you to remove components such as the RAM, the SSD, and (most importantly) the WiFi card. Some sellers of the 15-inch Spectre models are even putting 1-terabyte NVMe SSD cards in their systems by default.If you want to go with the 13-inch machine, it’s possible, but you’ll have to have a WiFi dongle in your USB-A drive at all times. Them’s the breaks, unfortunately.Other parts you’ll need:
- A USB 2.0 or 3.0 thumb drive (at least 16GB): A thumb drive like the SanDisk UltraFit is essential for the MacOS install. We recommend grabbing the 128GB drive, but you can also get away with this 16GB drive, too.
- A Broadcom BCM94352Z m.2 WiFi card: This part, which can be found on either NewEgg or eBay, is specific for a reason: There aren’t a lot of wireless drivers natively supported by MacOS, and many, like the Intel card in this machine by default, aren’t supported. If you do opt for the 13-inch version of this machine or decide you don’t want to crack open your device, you will either need an external WiFi dongle, a way to plug into ethernet, or a phone to tether via USB. You won’t be able to use some of the niceties of the Apple ecosystem with a dongle—such as Handoff or iMessage—and additionally, it’d be taking up one of the three ports on this machine.
- A Torx T5 screwdriver, a Phillips head screwdriver, and a plastic opening tool: For opening up the machine, of course. I recommend iFixit’s kit.
- A Mac that supports the OS you’re trying to install: This can be another Hackintosh or an older machine, by the way; just something you can use to actually build the boot disk.
- An external SSD (optional): Hackintosh-based machines don’t play very well with Apple’s next-generation APFS file system, the default in recent versions of MacOS. Using an external SSD allows a workaround for the older, more stable HFS+ file system. (It’s also great for peace of mind in case you want to do a test run before you go all-in on your install.) I prefer the 1TB SanDisk Extreme Portable in part because it supports both USB-A and USB-C.
Advertisement
And in case you’d rather a different type of machine, I can suggest two:

The HP Envy
Budget option: There are lower-end machines that can work with Hackintoshing, but probably the closest to the Spectre x360 is the early–2018 HP Envy. It’s not a convertible like the Spectre and has soldered-on RAM, but the processor is the same, it’s a more svelte 13 inches, and it has an upgradeable WiFi card and SSD. The screen isn’t 4K like the Spectre, but it’s also cheaper and has all the makings of a battery-life champ.Upgrade option: Not scared off by the MacBook Pro’s price, but want other options? The Lenovo Thinkpad X1 Extreme is perhaps one of the most capable high-end laptops on the market at the moment, and has a wide variety of customization options from Lenovo, including 4K screens. While there are aspects of it that don’t work—the Bluetooth is wonky and the Nvidia GeForce 1050ti isn’t compatible with Mojave—it’s worth looking at because it has really good documentation on Github, which is something you want when using a Hackintosh laptop.These are among the apps that you’ll need. For the most part (with some exceptions) you’ll download these onto an old Mac for either building your bootloader or later use on your Hackintosh. Here’s the list:
The Software You Need to Build a Hackintosh
- Clover: This is your bootloader, which will allow you to boot into your copy of MacOS. This is where the magic happens, and it will live on your machine’s UEFI partition, where boot instructions live. I recommend that you use this fork of it that has been tailored for laptop needs. You can download the latest versions here.
- Apple’s Xcode: This will be necessary for editing your config.plist file, the file in your Clover folder that tells the machine what to do load the boot process. You can also use a code editor for this—my personal preference is Atom—but this removes room for error in the editing process as it presents the list in a graphical interface, rather than raw code. That said, something of a best-of-both-worlds is the editor PlistEdit Pro ($29.95), which allows you to edit both in code and dialog-box interfaces, which comes in handy if you’re pasting an entry into your plist file.
- KextBeast: An installer for kernel extensions—something you’ll be using a lot during this process.
- IORegistryExplorer: For analyzing the individual parts of your system. You may need this when researching specific information on hardware you’re looking to install.
- Carbon Copy Cloner: If you used an external drive for this process, you’ll use this to copy over the final result to your actual drive. It’s a paid tool ($39.99) but comes with a 30-day trial.
- EasyUEFI: You’ll use this Windows app to manage what boots when you turn on your Hackintosh, so download this on your Spectre. It’s also a paid tool ($29.95) with a 14-day free trial.
- Intel Power Gadget: This tool—a mainstay of YouTube tech videos—will give you an idea if you’re getting full performance from your machine, as well as your power consumption.
Advertisement
Prepping a Windows Laptop to Turn Into a Hackintosh

A Torx screwdriver and the Spectre. Image: Ernie Smith
Now might be a good time to replace your wireless card; the stock card will not work with MacOS. To do so, turn off the machine, set up a clean workspace, and unscrew the screws at the bottom of your laptop with your Torx T5 screwdriver and a Phillips-head screwdriver. You’ll run into three types of screws on the bottom: Six small Torx screws along the perimeter, two slightly longer Torx screws near the screen hinge, and under the rubber feet, two standard Phillips screws. Once those have been removed, you’ll need to run a plastic opener across the bottom edges to pull up the tabs holding down the metal on the machine—this will take a little time, but take care during the process.Once you’re in, be sure to pull out the power cable connected to the battery with the help of the plastic opener, then pull out the tiny antennas attached to the Intel WiFi card, which is about the size of a postage stamp. (Need some help? iFixit has a guide that generally describes the process of removing and replacing an m.2 wireless card from a Lenovo Yoga; the process is similar for the Spectre.)
Advertisement

The new WiFi card installed. Image: Ernie Smith

The old WiFi card removed. Image: Ernie Smith
From there, unscrew the wireless card from the m.2 slot using a Phillips-head screwdriver, carefully install the Broadcom card you bought, securely fasten the antennas to the new card (and be careful doing so, as both the cables and card are fragile) and screw the new card in, then plug the power cable back into the battery and replace the case. (Test to confirm the WiFi and Bluetooth still works in Windows, of course. This also would be a good time to create a blank partition on your hard drive that can be replaced with MacOS, just an FYI.)As hardware fixes go, it’s pretty painless.To preface here, you cannot make a Hackintosh without a lot of resources, and due to the number of technical issues involved here, I will refer repeatedly to threads on Tonymacx86, a forum popular with Hackintoshers.For one thing, this is a long article and it’s inevitable that you might find something confusing here if you’re following it exactly. I also want to make clear that, if something goes wrong, it’s a great resource for solving your problems.With that in mind, I recommend a series of guides published by RehabMan, a Tonymacx86 moderator, including his FAQ on the basics of Hackintoshing laptops.I’ll also refer to guides made elsewhere, including cdxdl’s Spectre x360 guide for High Sierra, which largely works without too many issues in Mojave.
How to Set Up the Hackintosh Bootloader
Advertisement
Finally, we’re getting to the technical part. We’re going to want to build a USB drive for Clover. RehabMan goes over the details in this thread, but basically you’ll be formatting your trusty USB drive to include a number of basic things that will be required for boot. This guide aims to advise you on this specific build; for more general advice, I’d recommend reading his guide for pointers as well.To build your disk, go to a Mac, put in your USB disk, and load up the Terminal. From there, type this command:diskutil listYou’ll see a list of drives, including the one you plan to modify. For me, it looks something like this:`/dev/disk0 (internal, physical):
1: EFI EFI 209.7 MB disk0s1
2: AppleCoreStorage Macintosh HD 499.4 GB disk0s2 3: AppleBoot Recovery HD 650.0 MB disk0s3 /dev/disk1 (internal, virtual):
1: DOSFAT32 BLANK 16.0 GB disk2s1``/dev/disk0 (internal, physical):
1: EFI EFI 209.7 MB disk0s1
2: AppleCoreStorage Macintosh HD 499.4 GB disk0s2 3: AppleBoot Recovery HD 650.0 MB disk0s3 /dev/disk1 (internal, virtual):
1: DOSFAT32 BLANK 16.0 GB disk2s1``/dev/disk0 (internal, physical):
1: EFI EFI 209.7 MB disk0s1
2: AppleCoreStorage Macintosh HD 499.4 GB disk0s2 3: AppleBoot Recovery HD 650.0 MB disk0s3 /dev/disk1 (internal, virtual):
1: DOSFAT32 BLANK 16.0 GB disk2s1`In this case, I want to install to /dev/disk2/. It may be different on your device.RehabMan mentions a couple of basic methods for drive setup, but for our needs, we’re going with a two-partition method, which will create a full partition for EFI and a secondary partition where we’ll place the MacOS installer. In this case, the disk will be formatted using Master Boot Record, which tends to work across different types of PCs and Macs.
: TYPE NAME SIZE IDENTIFIER
0: GUIDpartitionscheme *500.3 GB disk01: EFI EFI 209.7 MB disk0s1
2: AppleCoreStorage Macintosh HD 499.4 GB disk0s2 3: AppleBoot Recovery HD 650.0 MB disk0s3 /dev/disk1 (internal, virtual):
: TYPE NAME SIZE IDENTIFIER
0: Apple_HFS MacHD +499.1 GB disk1 /dev/disk2 (external, physical):: TYPE NAME SIZE IDENTIFIER
0: FDiskpartitionscheme *16.0 GB disk21: DOSFAT32 BLANK 16.0 GB disk2s1``/dev/disk0 (internal, physical):
: TYPE NAME SIZE IDENTIFIER
0: GUIDpartitionscheme *500.3 GB disk01: EFI EFI 209.7 MB disk0s1
2: AppleCoreStorage Macintosh HD 499.4 GB disk0s2 3: AppleBoot Recovery HD 650.0 MB disk0s3 /dev/disk1 (internal, virtual):
: TYPE NAME SIZE IDENTIFIER
0: Apple_HFS MacHD +499.1 GB disk1 /dev/disk2 (external, physical):: TYPE NAME SIZE IDENTIFIER
0: FDiskpartitionscheme *16.0 GB disk21: DOSFAT32 BLANK 16.0 GB disk2s1`In this case, I want to install to /dev/disk2/. It may be different on your device.RehabMan mentions a couple of basic methods for drive setup, but for our needs, we’re going with a two-partition method, which will create a full partition for EFI and a secondary partition where we’ll place the MacOS installer. In this case, the disk will be formatted using Master Boot Record, which tends to work across different types of PCs and Macs.
Advertisement
You’re about to format your USB drive using the command line. I put in a placeholder for the name of your disk. Don’t put the wrong disk name in or bad things will happen. Trust me. Here’s the command:`# repartition /dev/disk2 MBR, two partitions
first partition, "CLOVER EFI" FAT32, 200MiB
second partition, "install_osx", HFS+J, remainder
diskutil partitionDisk [YOUR DRIVE HERE] 2 MBR FAT32 "CLOVER EFI" 200Mi HFS+J "install_osx" R`From here, you’ll need to hop into Clover, where you’ll put the information you need into the bootloader. Clover is considered “unsigned” software, so you’ll need to right click on it to open it or otherwise give MacOS permission to run it.
The setup process uses a standard MacOS installer. You’ll start off by selecting the installation location, with the CLOVER EFI partition you just created as the target. Before you simply install, you’ll need to customize some things for sake of the install. After hitting “Continue,” select Custom Install, and in the dialog box that’s shown, put in the settings as shown in this screenshot:

The only setting you’ll need to change are shown in this screen, fortunately, but the key things are that you only need to install for UEFI booting, and you’ll stick with the default UEFI drivers.
Advertisement
From here, you’ll need one additional file, HFSPlus.efi, which can be downloaded at this link. (Don’t forget this! You’ll need it to access your disks.)Hop into Finder, copy the file you just downloaded, and open up your CLOVER EFI partition. Move into the /CLOVER/drivers64UEFI/ folder and paste in that file. The result should look like this:

Now, you’ll need to install a number of kernel extensions for boot. (Think of these the way you might think of drivers in Windows.) I personally use a handful on my boot disk, though you’ll install the bare minimum when you initially boot it. The files you’ll need, along with download links and basic explanation of what they do, include:
- FakeSMC.kext: This is where the magic happens. Basically, it’s the spoof that makes Hackintosh possible, as it mimics Apple’s System Management Controller.
- Lilu.kext: A general-purpose patcher for kernel extension files. Necessary for WhateverGreen.kext, It keeps things running on the system and extends other extensions.
- WhateverGreen.kext: This patches various GPUs to support MacOS, including the Intel HD 620 that’s inside the Spectre x360.
- USBInjectAll.kext: This adds access to USB ports, as you might guess by the name.
- VoodooPS2Controller.kext: This adds basic keyboard and trackpad support.
Advertisement
Once you download these files, place them in /EFI/CLOVER/kexts/other/. The final result should look like this:

Got all that done? Great! Now it’s time to pull up your trusty code editor, as we need to set up the Config.plist file, which manages the basic configuration of your MacOS install. There’s a full list of general laptop configurations managed by RehabMan on Github, but for the Spectre x360, the one you’ll want is named config_HD615_620_630_640_650.plist. Click this link and save the text file that loads to your desktop. You need to do some light surgery before you put this in your folder.

Next up, we’re going to hop into Xcode and open up the file you just downloaded. Once open, hit Command-F, and look for the string #ig-platform-id. Click on the string to edit it, removing the hash sign in front of it. Then look for #IntelGFX and do the same thing. Finally, look for the term lilucpu=9; this tells the Lilu.kext that it’s a Kaby Lake CPU, but this setting causes errors with the graphics that will prevent the machine from booting, so we’re going to change that to lilucpu=8, which spoofs the device as the prior Skylake generation.(Side note: The lilucpu fix in the prior paragraph reflects about five hours of troubleshooting on my end. Even those of us who have been at this a while have trouble with this stuff sometimes!)
Advertisement
Now save. After you do that, rename the config.plist file in your folder config_old.plist, copy the file you just saved to the folder, and rename config_HD615_620_630_640_650.plist to config.plist. We’ll return to it later, but you should have enough to get into the installer.One last change we need to make in the EFI folder before we go: Hop over to this page and download PreLoader.efi, which is a Linux-based boot tool that will be needed to boot into your system. Copy that into your /EFI/CLOVER/ folder, then rename the existing CLOVERX64.efi file to loader.efi. (This gets around an error in the way HP machines handle EFI boots.)Finally—last step for prepping your installer!—we’re going to put the Mojave installer on our USB drive. Hop back in the terminal and type in this command:Now, boot your computer with the USB drive in and (if you bought it) an external SSD drive connected. (You can either set USB drives to boot first in the BIOS, or hit F9 and load the drive manually; up to you.) You’ll be greeted with this high-resolution, very green screen:
sudo "/Applications/Install macOS Mojave.app/Contents/Resources/createinstallmedia" --volume /Volumes/install_osx --nointeractionGive it a minute, and once it’s fully downloaded, you’ll want to rename the partition to something more manageable. Use this command:sudo diskutil rename "Install macOS Mojave" install_osxAt this point, you’ve got your USB drive ready. Time to install!The Hackintosh MacOS Installation Process

Advertisement
Welcome to Clover. My machine already has MacOS (and Windows) installed, so you won’t have a bunch of apples on this screen like I do. But from here, you’ll be loading up the MacOS installer.The boot process will take a while to load, just a heads-up, but a faster USB flash drive helps here. If you made the above changes, you should be able to get in with correctly displaying graphics and accessible WiFi, but if you need to troubleshoot anything, RehabMan’s guide offers plenty of details to dive into.Once you’re in the installer, set up MacOS on a blank partition on your disk—either format the one already created on Windows for APFS, or use an external disk drive. Let the process go through—odds are it will reboot a few times, kicking you back into Clover more than once, and may take as long as an hour. Leave your USB drive in, plug in the laptop, and let it do its thing.Once it’s done, boot up again via the USB drive. You should have access to the partition where you just installed MacOS through the boot process. Before we try to launch into MacOS, hit the F4 key while still in Clover. While it doesn’t look like it’s doing anything, it’s actually saving some information from your system BIOS that we’ll be modifying later. (More on that in a few.)Anyway, let’s try to boot it up. During the process, you will likely see a small Apple logo, and about two-thirds of the way through booting, the logo image will glitch on the screen, and then grow larger in size. The glitch, surprisingly, is a sign that the Intel graphics acceleration is working and adjusting to the 4K screen—and that the machine will correctly boot.
Advertisement
If it loads, awesome news! You’re halfway there. If it doesn’t load, now would be a good time to make friends with forums such as Tonymacx86, InsanelyMac, or /r/Hackintosh/.One tip I have for first-timers: While choosing a given partition in Clover, hit the space bar, rather than enter, to load up boot options. For a MacOS partition, if you’re having trouble booting, select the option for “verbose mode”—which essentially exposes the text-based boot process. A lot of errors will pass by on your screen in this mode, most of which aren’t worth worrying about, but if it seems to hang anywhere during boot, search for the term in Google or on one of the popular Hackintosh forums. Odds are, someone has run into this problem before.At this point, if you’ve managed to get to the desktop on MacOS, you have a Hackintosh. It has working WiFi and Bluetooth, most likely, but no sound, no brightness controls, and no way of knowing whether you’re plugged in or even have any battery life. You can’t even get into MacOS without this USB drive you created.You could stop now, but it’d only be half the experience. So, let’s keep going. First up, grab a USB drive or set up a way to copy over the apps we downloaded at the beginning of this process; we’re going to need them soon. You will also want to download Xcode to have on the machine for purposes of editing Plist files and handling system commands needed for working in the terminal.
Getting the Hackintosh Working
Advertisement
After setting up your account, load up Terminal in MacOS. We’re going to type in a couple of commands. First up, copy and paste this:
sudo pmset -a hibernatemode 0
sudo rm /private/var/vm/sleepimage
sudo mkdir /private/var/vm/sleepimage
This removes the hibernation feature, which your machine does not support.Next, we’re going to install the bootloader onto the machine you’re using. Type diskutil list. You’re looking for a folder labeled EFI on the drive you just installed; for me, it’s disk0s1. Then, type these two commands, modifying them for your drive:sudo mkdir /Volumes/efi
sudo mount -t msdos /dev/[YOUR DRIVE HERE] /Volumes/efiIf you did this right, you’ll see a new drive in your Finder for your UEFI folder. Go into your CLOVER EFI disk, copy the entire /EFI/CLOVER/ folder, and paste it inside the /EFI/ folder of the partition that just appeared. (And while you’re at it, copy the contents /EFI/CLOVER/Kexts/Other/ directly to your desktop. You’re going to need them in a few.)Even with Clover moved onto your drive, it’s not ready until it’s bootable—which means, if you’re running multiple partitions, you’ll need to hop into Windows to run EasyUEFI, which allow you to set the bootloader you prefer. Clover supports Windows, so no worries about losing access. (And don’t put your USB drive away—while we’ll make edits to the config.plist file from the EFI drive from this point, we’ll want to keep it around just in case anything breaks and we need a reference to work from.)Advertisement
Once we’re done with that, we’re going to hop back into your Hackintosh and install a number of kernel extensions. Remember those kext files we copied from your EFI folder to your desktop? We’re now going to install them on your machine—with the exception of one, BrcmFirmwareData.kext, which we’ll replace with BrcmFirmwareRepo.kext a version that’s intended to stay on your main drive. Send the old one to the trash and grab the new one from the same location as before, putting it on your desktop with everything else.

Open up the program KextBeast, and it will allow you to install those kernel extensions with an easy-to-use interface. It uses a pretty standard installer process to set up the extensions, and will ask you to put your kexts in one of two places: /Library/Extensions/ and /System/Library/Extensions/. You will, with few exceptions, want the former.Once you get those loaded, give it a moment and head to the terminal. Type this command: sudo kextcache -i /. This clears your kernel extension cache and properly installs all the extensions you just set up. If there is something wrong with the kexts you’ve installed, this command will surface those errors, but it will also reset everything for the next boot.Restart, and make sure everything works.
- Now that we have our baseline, let’s install some more kexts for things you probably need, using that same process. Since this is your first time, I would recommend installing each of these individually, so if something goes wrong, you can easily detect it. I’m linking to the download location for each one, so as to encourage you to grab the latest version:
- ACPIBatteryManager.kext: Manages the battery and makes the charger icon visible in your menu bar. You can download here to add now, but we’ll need to make some changes to your machine to support it.
- AppleALC.kext: This frequently updated patch, downloadable here, manages sound devices for Hackintosh machines. You’ll want to make an edit to config.plist after you install this: Open it up in Xcode, search for #layout-id, and remove the hash sign. For the corresponding ID, 3 is a good default for your card, but I’ve had better luck with 1.
- AppleBacklightFixup.kext: This plugin for Lilu.kext, which can be downloaded here, manages the backlight for your screen, which is a multi-step process that requires changes to your ACPI (Advanced Configuration and Power Interface). RehabMan goes through the installation process in this thread. Essentially, you’ll install the kext to your machine, then copy the file SSDT-PNLF.aml, to /EFI/CLOVER/ACPI/patched on your EFI drive.
- [Optional] EFICheckDisabler.kext: This kext, found in this collection of hack tools from RehabMan, disables a weekly message from Apple that looks to verify your EFI file.
- [Optional] FakeSMC_ACPISensors.kext, FakeSMC_CPUSensors.kext, FakeSMC_GPUSensors.kext, and FakeSMC_LPCSensors.kext: These kexts, which work with the essential FakeSMC.kext (and are downloadable here), allow you to track system vitals with HWMonitor, something that you might want to take a look at if you’re running a Hackintosh. The website Hackintosher has more details about this.
- [Optional] NoTouchID.kext: If you use a password manager like 1Password, it might run into issues because the machine is assuming a fingerprint reader is there, when there actually isn’t. This kext, downloadable here, turns it off.
- VoodooI2C.kext and VoodooI2CHID.kext: These kexts, downloadable here, work in tandem—VoodooI2C, through a series of satellite kexts, manages access to Inter-Integrated Circuit (I2C) bus, a protocol often used for managing communication to serial components on the same board. In the case of Hackintosh, it’s widely used to manage “human interface” devices such as trackpads and touchscreens. (Touchscreens, you say? More on that later.) The Spectre uses a Synaptics touchpad, so you may want to experiment with VoodooI2CSynaptics.kext as well, but that extension is relatively new and devices may not be as well-supported as on VoodooI2CHID.
Advertisement
Install these one by one using KextBeast and the terminal, rebooting in-between. The process can be a bit of a slog doing it this way, but if something goes wrong, it can help you isolate the problem.Once gone, head to Finder, hit Shift-Command-G, and go to the folder /Library/Extensions/. The result should look like this when you’re done:

The Hardest Part of Converting a PC to a Hackintosh
Advertisement

It’s a lot of files, and they look pretty daunting. The good news is that you only need some of them. The bad news is that you’re going to be compiling some code.RehabMan, who is an impressive resource for the Hackintosh community, has a guide about this on Tonymacx86, which I recommend you read in full. For sake of keeping this simple, I’m going to basically tell you which commands to type, but I do recommend you spend some time researching how this works.First things first, download the application MaciASL from RehabMan’s BitBucket account, extract it, and put the program in your Applications folder.If you haven’t yet installed Xcode, do so. After that’s ready, now you’re going to set up a command line tool called iasl, which MaciASL interfaces with. You’ll type in these commands to get the tool:
mkdir <strike>/Projects && cd </strike>/Projects
git clone [https://github.com/RehabMan/In...](https://github.com/RehabMan/Intel-iasl.git) iasl.git
cd iasl.gitThen these commands to build it, install it, and place a copy inside of MaciASL:make
sudo make install
sudo cp /usr/bin/iasl /Applications/MaciASL.app/Contents/MacOS/iasl62You should now have a working copy of both MaciASL and the iasl command line tool.Now, make your EFI folder accessible using the commands I showed you earlier. Figure out the name of your EFI folder using diskutil list, then type:Advertisement
sudo mkdir /Volumes/efi
sudo mount -t msdos /dev/[YOUR DRIVE HERE] /Volumes/efiNext, change your directory to where all those files are located: cd /Volumes/efi/EFI/CLOVER/ACPI/origin. From there, launch a new Finder window, hit Shift-Command-G, and load up the same folder there. In Terminal, type:ls -l SSDT*.amlThis will give you a list of files with the phrase SSDT, along with their file sizes. Confirm that none of them are duplicates, and if any are, delete them. Now, go back to Finder and copy every file that starts with SSDT, along with DSDT.aml, into a folder titled ssdt. Back in the terminal, type these commands:cd ssdt
iasl -dl DSDT.aml SSDT*.amlCongratulations, you just disassembled a ton of files. In Finder, hop into the folder and sort by date to keep them separated from one another. It might be a good idea to create a ZIP of the DSL files so you have pristine copies in case anything goes wrong.Now, let’s hop into MaciASL. Open up DSDT.dsl from the Finder and you should see a screen like this:
Let’s hit “Compile,” just to see what happens:

Yeah, a ton of errors. That sucks. Click on one of the entries, and you’ll see this unusual sight:

That’s a lot of Zero, and there are tons more where that came from. To fix the compilation errors, you’re going to delete them, both from that section and from Method (HPME, 0, Serialized) directly below it. That’s the only thing preventing it from compiling. (Your machine may compile things differently, just an FYI.) Hit Compile again, and if you get a dialog box with a bunch of warnings, good news, it should work:
Advertisement

Now, let’s do what we came here for. Hit the “Patch” icon up top and a screen like this will come up (though you may need to widen it up a little:

Now, from this menu, you’re going to add in a bunch of patches, including:
- [sys] Fix _WAK Arg0 v2
- [sys] Fix Mutex with non-zero SyncLevel
- [bat] HP G6 2221ss
- [sys] HPET Fix
- [sys] SMBUS Fix
- [sys] IRQ Fix
- [sys] RTC Fix
- [sys] OS Check Fix (Windows 10)

Hit apply, and the text should disappear, as it’s been patched.We’re also, as recommended by ctxdl, going to paste in this patch to add brightness control keyboard commands to the Spectre:
into method label _Q10 replace_content
begin
// Brightness Down\n
Notify(\_SB.PCI0.LPCB.PS2K, 0x0205)\n
Notify(\_SB.PCI0.LPCB.PS2K, 0x0285)\n
end;
into method label _Q11 replace_content
begin
// Brightness Up\n
Notify(\_SB.PCI0.LPCB.PS2K, 0x0206)\n
Notify(\_SB.PCI0.LPCB.PS2K, 0x0286)\n
end;
After all that, there’s just one more necessary change we want to make: We’re going to turn off the Nvidia MX150 GPU in this machine, which we won’t be using for MacOS and will otherwise just be draining power your battery could use. (Don’t worry, Windows and Linux can still use it.)Advertisement
With cues from ctxdl and RehabMan, we’ll be hopping into some of the SSDT files we made earlier. We need a specific variable of code to get started, but we don’t know what file it’s in. Hop into Finder and do a search in your /Volumes/efi/EFI/CLOVER/ACPI/origin/DSDT folder for the _OFF entry. In my case, it was in SSDT-11-827F.dsl and SSDT-10-827F.dsl. Open those files in MaciASL. Now we’re going to be looking for an _INI reference in the code of these files. Let’s start with SSDT-10-827F.dsl, which has a reference that looks like this:
Scope (\_SB.PCI0.RP01.PEGP)
{
Method (_INI, 0, NotSerialized) // _INI: Initialize
{
Store (Zero, \_SB.PCI0.RP01.PEGP._ADR)
}
}
Inside of that, you’re going to paste in a couple of lines, with the end result looking like this:Scope (\_SB.PCI0.RP01.PEGP)
{
Method (_INI, 0, NotSerialized) // _INI: Initialize
{
Store (Zero, \_SB.PCI0.RP01.PEGP._ADR)
//added to turn nvidia/radeon off
External(\_SB.PCI0.RP01.PEGP._OFF, MethodObj)
_OFF()
}
}Then hop back to Finder, and look for Store (Zero, \_SB.PCI0.LPCB.EC0.GFXT). In my case, it was in SSDT-9-827F.dsl. Now hop in the file and comment out that line, so it looks like this: // Store (Zero, \_SB.PCI0.LPCB.EC0.GFXT).Finally, hop back to your DSDT.aml, and look for Method (_REG, which should look like this:Method (_REG, 2, NotSerialized) // _REG: Region Availability
{
If (LAnd (LEqual (Arg0, 0x03), LEqual (Arg1, One)))
{
Store (One, ECOK)
GBAS ()
ECMI ()
}
}Advertisement
You’re going to replace that with an extra section that turns off the graphics card:
Method (_REG, 2, NotSerialized) // _REG: Region Availability
{
If (LAnd (LEqual (Arg0, 0x03), LEqual (Arg1, One)))
{
Store (One, ECOK)
GBAS ()
ECMI ()
}
//added to turn nvidia/radeon off
If (LAnd(LEqual(Arg0,3),LEqual(Arg1,1)))
{
Store (Zero, \_SB.PCI0.LPCB.EC0.GFXT)
}
}
Once you’ve made changes on each of these files, hit “Compile” to ensure no errors come up.Now that we’re done our patches, we’re going to export the files as binaries our machine can read. For each file you just edited, go to the menu and hit File > Save As. Save the edited file in the “ACPI Machine Language Binary” file format with the .aml extension in the folder /Volumes/efi/EFI/CLOVER/ACPI/patched. Once your edits are in, the folder should look like this:
Feeling a little stressed out after all that? Trust me, I get it. But once that patch is complete, you’re past the really hard part. Be sure to save your work on the files you worked on in dsl format as well, in case you need to make patches later—you never know—then close up shop and restart your machine to test everything.When you log back in, you should be able to see a battery meter in the top corner of your menu bar, your brightness controls should work, and if you go into the system preferences, it should detect a trackpad.
Advertisement
To figure out if you managed to turn off the GPU, you’re going to load up Intel Power Gadget to test. To confirm it’s been turned off: In the Frequency screen, the “GFX” area should be basically flat during standard use.At this point, we’ve covered all the big things, but there are still some quality-of-life improvements that deserve some consideration.One of those is in the performance department. For all the work you just did on this Hackintosh, your HP device is not optimized for MacOS and will use power more inefficiently than Apple’s own laptops—which, to translate, means that battery life won’t be the greatest. All is not lost, however. There are things you can do to fix this, and much you can do to optimize the process at a granular level.But for the sake of simplicity, we’re going to focus on two small fixes that are relatively simple to implement. The first involves a feature that Skylake and later Intel architectures natively support, something called Speed Shift or HWP (Hardware P-States), which manages performance at a hardware level. This is relatively easy to implement and is also relatively easy to tweak. Hop into config.plist using a code editor and search for the Boot entry. Below the entry, paste this (pastable text here):
One Last Round of Hackintosh Fixes
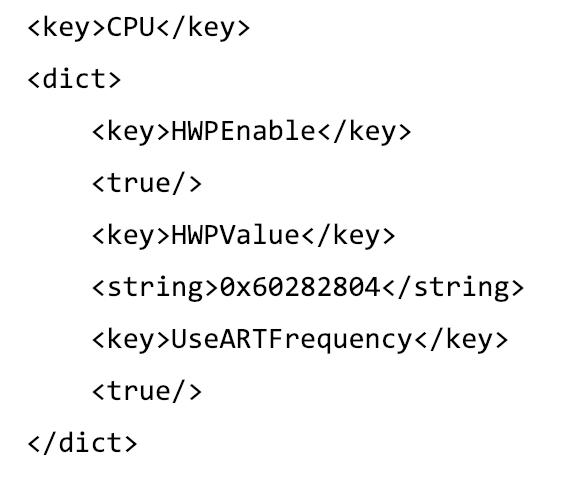
This HWPValue I chose above (further explained here) is something of a good middle ground between performance and battery life. If you want more performance, cut the front number on the HWPValue from 0x60 down to 0x20; if you want to maximize your battery life, change it to 0x80, but expect slowdowns.
Advertisement
The other fix will put us back in our old friend MaciASL, but only for a second. We’re going to download the file SSDT-XCPM.dsl from GitHub, then load it up in the app. All you have to do is compile the file, saving it in an .aml format, and save it to /Volumes/efi/EFI/CLOVER/ACPI/patched.(A non-technical solution for battery life that’s worth looking into is Turbo Boost Switcher, a Mac app intended for Apple native devices that also works well with Hackintosh.)

With this optimization and others, I can generally get 4–5 hours of battery life out of this machine in moderate to heavy use. The result keeps Intel Power Gadget on a fairly even keel.

Last up is something you’ll probably want to do if you used the external SSD to set everything up: copy everything over to a drive on your internal SSD. I would recommend keeping a Windows partition around for purposes of installing HP BIOS updates, but hop into Disk Utility and set the partition you created for MacOS, formatting it as MacOS Extended (Journaled).

Then you’ll load up Carbon Copy Cloner. You’ll copy the partition over, a process that could take as long as an hour depending on how much data is on the drive.Once you’re done with that, modify the EFI partition on the primary SSD, loading it up using the terminal-based process we mentioned above. You’ll have to create an efi and an efi2 folder for your partitions, but once you copy your clover folder over, you should be able to boot without another drive attached to your device.There are a couple of small things you can do at this point—you can hop in the BIOS and turn back on Virtualization Technology, and set the System Power Scheme to “Balanced”—but I’ll let you take it from here.Welcome to your new Hack.

The successfully Hackintoshed device. Image: Ernie Smith
Why You Should Convert a PC into a Hackintosh (and Why You Shouldn't)
How to Get a Touchscreen Working in MacOS:

These lines are necessary to prevent Apple’s own I2C controllers from getting run—and allow us to enable the touchscreen on the Spectre.Granted, the implementation isn’t quite the same as Windows or iOS—while it supports the Spectre’s included pen (a nice value add for Photoshop and Illustrator), and there’s no onscreen keyboard, like you’ll find on those interfaces. Additionally, things get wonky with a second monitor, as the touchscreen isn’t treated as a separate form of input from the mouse cursor. (And it used to be worse: There was a bug in the extension for a while that broke two-finger scrolling, but that’s fortunately been fixed.)But it’s honestly one of my favorite unsanctioned MacOS features and it has a serious wow factor for Mac fans. My general setup for the machine while I’m out is to put the Spectre in “stand mode,” using a secondary mechanical keyboard and Magic Trackpad 2 in place of the regular keyboard, which gives me easy access to finger scrolling if I want it. (Apple doesn’t offer this kind of experience at the moment on any of its devices—you either get the trackpad or touchscreen, never both.)Overall, the Hackintosh process, while it takes some time and will lead to some headaches, is one for people who are willing to tweak. It’s not an easy process, but the complexity of some of the guides out there can be a deterrent to those who might otherwise be willing to try. I hope that this guide, with all its detail, might convince you that not only is it possible, it can even be insanely great.
The Buyables:
- An HP Spectre x360
- A USB 2.0 or 3.0 thumb drive (at least 16GB)
- A Broadcom BCM94352Z m.2 WiFi card
- iFixit screwdriver kit
- A Mac that supports the OS you’re trying to install
- An external SSD